
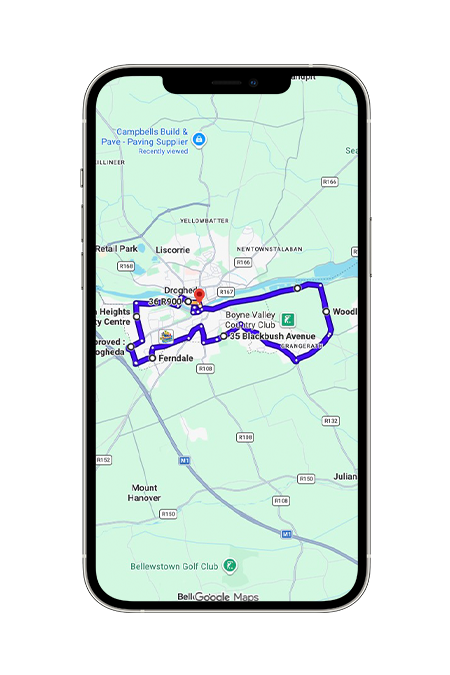
Explore Drogheda’s Dublin Road, Donore Road, Rathmullan Road and busy local roundabouts with realistic Google Maps driving test routes designed around the roads and junctions you’ll encounter on test day.
Practise our Google Maps routes based on Drogheda’s local roads and junctions before your driving test.
Instant download · €12.99
Local Tip: Arrive 15-20 minutes early. The area can get busy around school start and finish times.
Pro Tip: Master these hotspots and you’ll eliminate the most common reasons learners fail in Tallaght.
These are the roads, roundabouts and junctions where Tallaght learners most commonly lose marks during the driving test.
The Issue: Leaving the test centre with visibility obscured by hedges when turning right.
Why People Fail: Candidates fail to bring the vehicle to a full stop, pulling out blindly.
The Issue: A highly active multi-lane roundabout immediately following the test centre exit.
Why People Fail: Drivers fail to change lanes assertively, causing sudden, dangerous lane corrections.
The Issue: A layout where the left lane from Drogheda is strictly left-turn only.
Why People Fail: Drivers misread road-surface markings and cut across traffic to go straight ahead.
The Issue: A busy housing layout heavily used for the reverse around a corner manoeuvre.
Why People Fail: Candidates focus entirely on the kerb and fail to maintain 360-degree observations.
The Issue: Merging onto the fast-flowing Dublin Road artery from smaller local connecting roads.
Why People Fail: Candidates panic due to continuous traffic, resulting in excessive hesitation or dangerous gap choices.
The Issue: Narrow paths running parallel to the river featuring tight blind bends.
Why People Fail: Poor speed management; drivers approach the bends too fast or cut into oncoming lanes.
The Issue: Navigating the tight urban core with narrow lanes and sudden pedestrian presence.
Why People Fail: Drivers miss speed limit changes dropping to 30 km/h or block pedestrian crossings.
The Issue: A clearly marked “STOP” sign with a solid white line at an intersection.
Why People Fail: Performing a rolling stop instead of making a complete, dead stop behind the line.
The Issue: A large roundabout handling a heavy mix of industrial and M1 link traffic.
Why People Fail: Drivers display incorrect lane positioning, drifting across internal lane markings and cutting off vehicles.
The Issue: A steep residential hill climb used by examiners to test the hill start check.
Why People Fail: Poor handbrake-clutch coordination, causing the car to roll back or stall the engine.
Examiners see the same patterns again and again. Avoid these common mistakes to give yourself the best chance of passing.
Test Exit: Skipping scans at Southgate exit.
Roundabouts: Cutting lanes on R132/Donore Road.
Yielding: Forcing oncoming traffic to brake.
Mirrors: Changing lanes without prior checks.
Positioning: Drifting near white lines or kerbs.
Hesitation: Waiting unnecessarily at clear gaps.
Clearance: Passing parked cars too closely.
Speed: Adapting slowly to 80 to 50 km/h drops.
Manoeuvres: Relying on mirrors during reverses.
Stop Signs: Rolling past solid stop lines.
Most Tallaght learners fail due to observation, positioning, and hesitation rather than manoeuvres themselves.
These are the local hazards, misleading road layouts and hidden danger zones that frequently catch Drogheda learners off guard during the driving test.
Hazard: Parked cars and commercial vehicles blocking exit sightlines.
Trap: Moving off without full observation or forcing into tight gaps.
Hazard: High-speed multi-lane roundabout with heavy M1 commuter traffic.
Trap: Wrong lane approach or drifting across lane markings when exiting.
Hazard: Notoriously steep incline requiring precise clutch and handbrake control.
Trap: Rolling backward when moving off from a stop.
Hazard: Historic boundary walls obscuring cross-traffic visibility.
Trap: Emerging too quickly without using a slow “creep and peep.”
Hazard: Delivery vans, turning buses, and active town-centre shoppers.
Trap: Forcing through tight gaps instead of holding back to yield.
Hazard: Rapid speed drop from 60 km/h regional to 50 km/h urban zones.
Trap: Coasting past limit signs and dropping speed late.
Hazard: High pedestrian volume, buses, and opening doors at peak hours.
Trap: Driving 50 km/h when conditions require a slower defensive pace.
Hazard: Estate roads with sloped kerbs and hidden driveways.
Trap: Mirror-relying instead of physical 360° rear-window checks.
Hazard: Compact painted mini-roundabouts where drivers cut corners.
Trap: Driving over the central painted island when turning right.
Hazard: Tight residential cul-de-sacs with parked cars and steep channels.
Trap: Rolling or touching kerbs during turnabouts.
Local awareness, correct observations, and smooth decision-making are key to handling these traps with confidence.
Built from real learner feedback, local route analysis, and examiner behaviour patterns.
Instant PDF download · €12.99
Secure checkout · Access immediately
100% Tallaght focused
Clear maps & instructions
Prepare with confidence
Download and start today
Clear answers to the most common questions about the Drogheda test centre and driving test routes.
The routes are moderate in difficulty. You’ll encounter a mix of residential roads, busy main roads, roundabouts, and dual carriageways. Good observation and lane discipline are key to success.
Common roads used around Drogheda include Dublin Road (R132), Donore Road, Rathmullen Road, Marsh Road, Beamore Road, Colpe Road, and roads around Bryanstown and Southgate.
Yes. Common roundabouts include the R132 Dublin Road / Colpe Road Roundabout, R132 Dublin Road / Beamore Road Roundabout, and Mill Road / Colpe Road Roundabout.
Common issues include poor observation at junctions, incorrect lane choice on roundabouts, speeding on open roads, and hesitation at controlled intersections.
Yes! Our pack includes Google Maps route previews so you can familiarise yourself with the roads, junctions, and roundabouts before your test.
Yes. Drogheda (Southgate) is a relatively busy test centre. Recent figures show above-average demand and longer waiting times than many Irish centres, although waiting times have recently improved.
We use cookies to improve your browsing experience, analyse site traffic, and support essential website functionality. By clicking "Accept All", you consent to our use of cookies.
Manage your cookie preferences below:
Essential cookies enable basic functions and are necessary for the proper function of the website.
These cookies are needed for adding comments on this website.
Stripe is a payment processing platform that enables businesses to accept online payments securely and efficiently.
Service URL: stripe.com (opens in a new window)
Statistics cookies collect information anonymously. This information helps us understand how visitors use our website.
Google Analytics is a powerful tool that tracks and analyzes website traffic for informed marketing decisions.
Service URL: policies.google.com (opens in a new window)
You can find more information in our Cookie Policy and Terms & Conditions.